Are you getting tired of the same old single tone nail designs? Well, we’re here to help!
We’ve compiled a list of easy nail designs that you can do from the comfort of your own home. With our help, even if you’re not an expert artist, you can still make your nails look like a masterpiece.
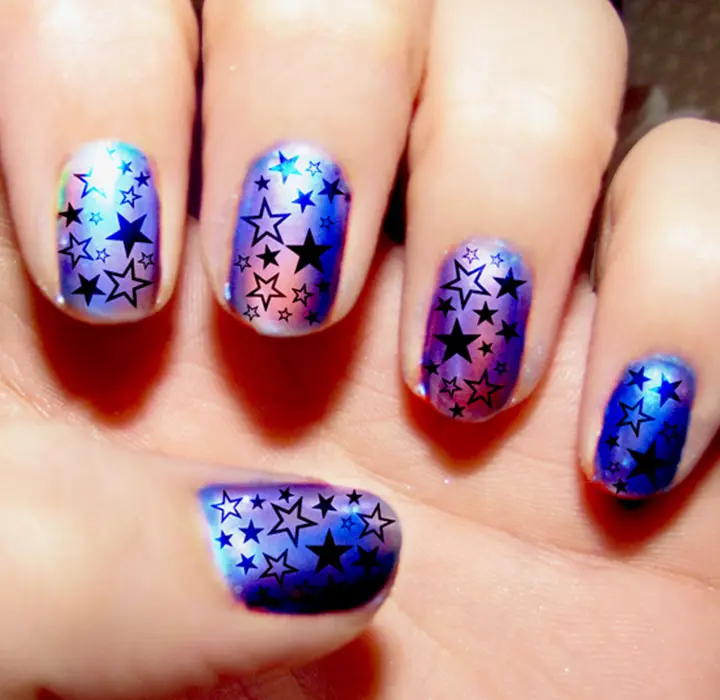
These days, painting your nails has become an essential beauty trend that can transform your nails into genuine nail art. What’s more, it’s not that complicated!
There’s no need for you to go all out and buy those fancy products and tools. All you need to have is motivation and a little help from the Beautified Designs team.
So let’s get started! Here are some of the best and easiest DIY nail art designs that will make people ask “What’s the special occasion?”
Cute Easy Nail Design and Ideas
Here, we have gathered some of the best easy nail designs so that you can be part of the latest trend regardless of your skills and creativity.
1. Easy Nail Designs with Black and White Pattern
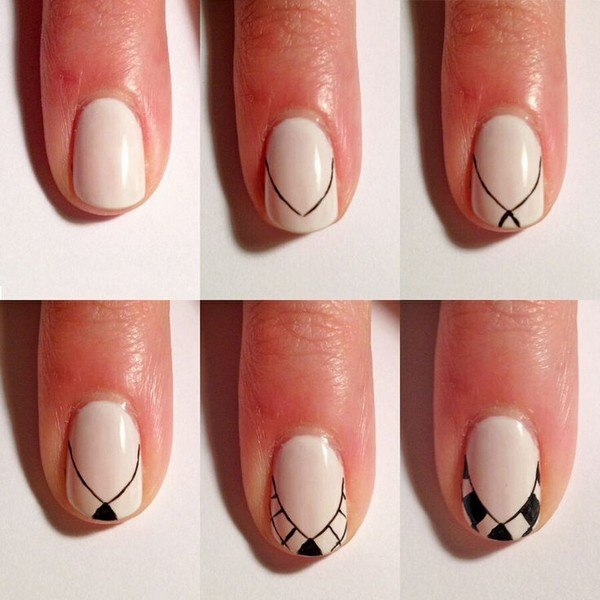
This delicate nail design is super easy to achieve and a perfect effortless nail trend for this summer.
- Start by applying the base coat to your fingernails.
- Then use a pointed marker to draw a cute design. Simple!
2. Easy 4th of July Nail Designs
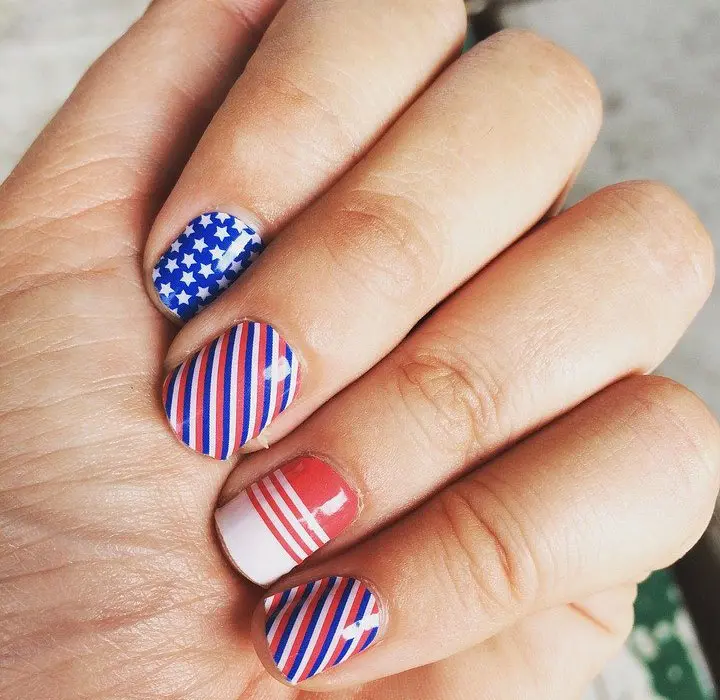
Celebrate this 4th of July with this easy-to-do holiday nail design.
- Apply white nail polish on your four fingers and blue color on your thumb.
- Paint a red color on some tape and then cut the strips.
- Follow this step by sticking tick two strips on each fingernail.
- In the middle of the thumbnail, paint a little star using white nail polish.
- Finally, top it off using a clear coat nail polish.
3. Easy Nail Designs with Zigzags and Stripes
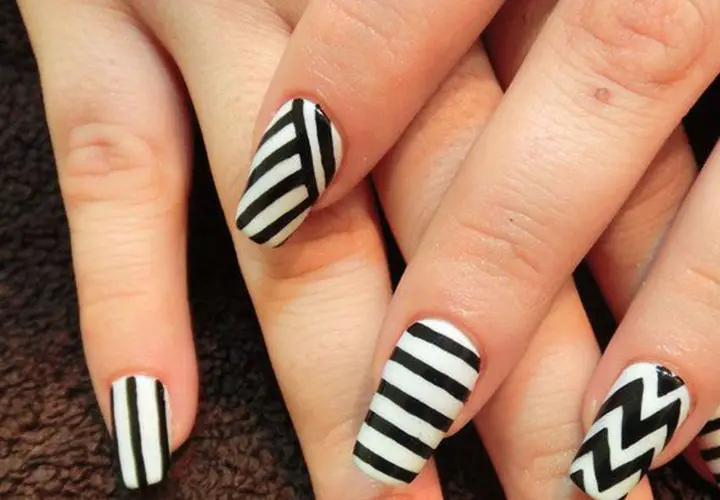
This beautiful nail design may look difficult, but we promise you it’s way easier than it seems! All you need is some black and white nail polish and a pair of scalloped scissors.
- Use shearing scissors in cutting the zigzag or scalloped pattern onto some scotch tape.
- Apply a green color onto your nails, then let it dry.
- To finish up, stick the tape on the nails and apply the second color. Voila!
4. Easy Nail Designs with Blue Diagonals
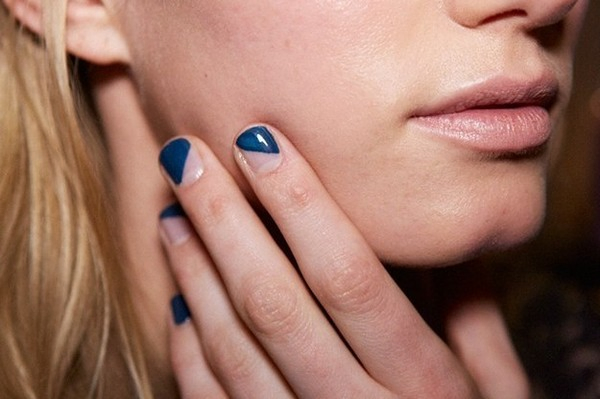
A simplistic and easy-to-do nail design, this effortless look is by far one of our favorites.
- Place some tape diagonally across your fingernail then paint your chosen color.
- When the nail polish is dry, remove the tape.
- Complete the look by applying a clear coat on top.
5. Easy Chevron Nail Design
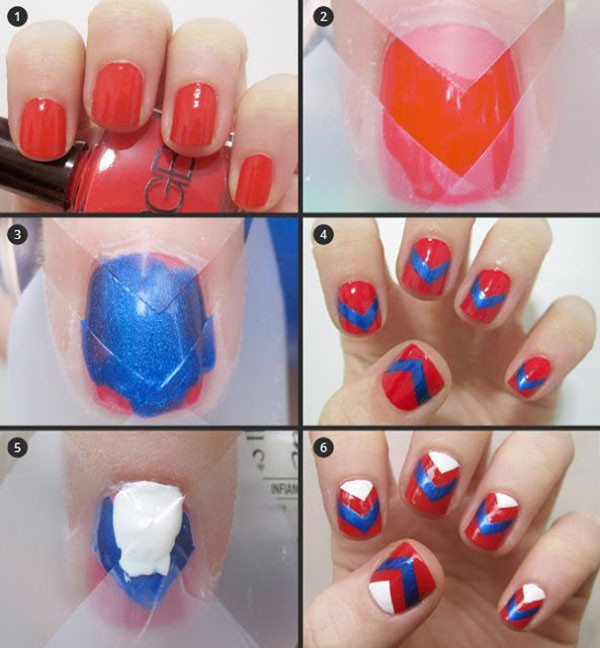
Don’t mistake this look as difficult to achieve. With patience and motivation, it’s actually quite simple.
- Apply dark red nail polish on all the nails.
- Using some scotch tape, create a chevron shape on the nails.
- Continue by applying a vibrant blue polish and leave it to dry.
- When dry, stick two pieces of scotch tape on the base of the nails to form a triangle.
- Complete the design by applying white nail polish.
- Remove the scotch tape and apply a topcoat.
6. Easy Nail Design with Clouds
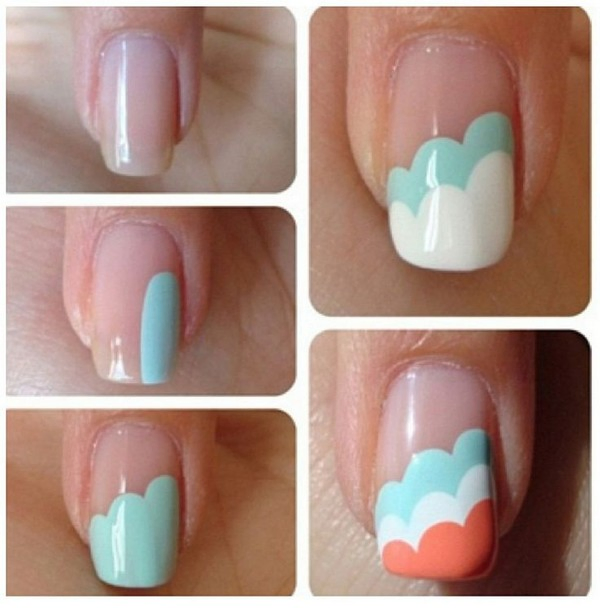
This beautiful nail design looks tricky to do, but it’s actually super easy to achieve. You just need to follow our simple technique!
- Start this nail design by painting the first layer of clouds vertically using a light mint green polish.
- Continue with using white nail polish as your second color then finally paint the red color to complete the look.
7. Easy Nail Designs with Black Diagonals
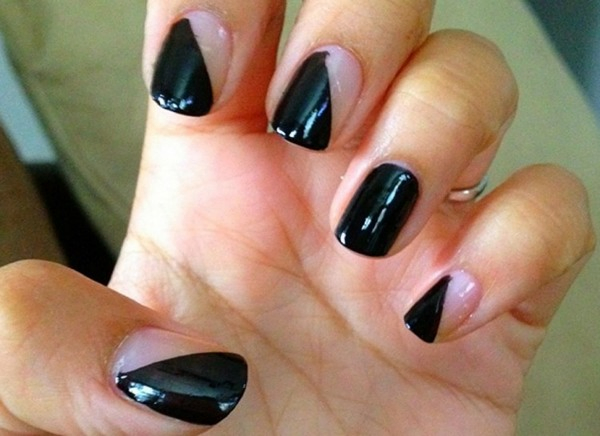
This look is for people who want to have a minimalistic yet quirky nail design, and it’s super easy to do!
- Get some scotch tape and place it diagonally on your nail.
- Paint a black color. Remove the tape and let it dry.
8. Easy Nail Designs with Scotch Tape
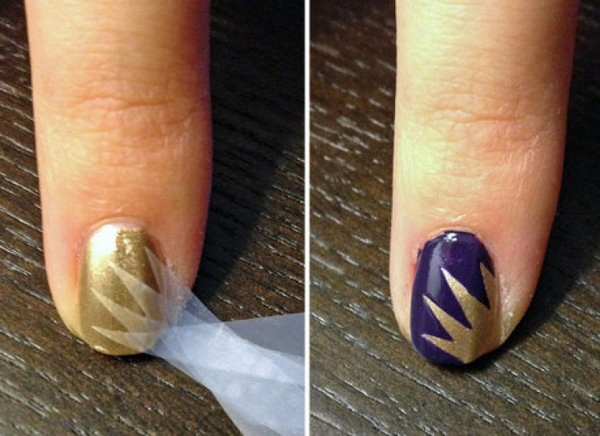
Get creative when applying the nail polish and design some unique looks.
- First, apply a base coat.
- Cut your preferred shape out of some scotch tape.
- After the base coat has dried up, place the strips of tape onto the nails.
- Apply the topcoat and enjoy having this amazing design.
9. Easy Floral Nail Designs
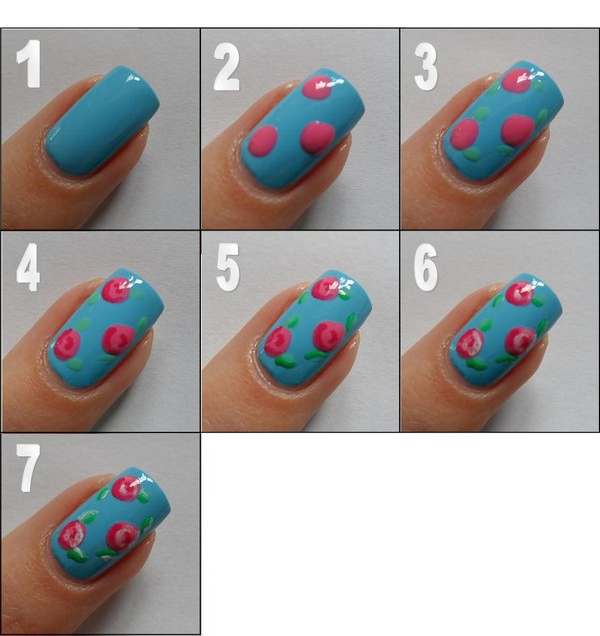
This summery nail design is perfect for brunches and picnic, and will draw everyone’s attention to your nails.
- Start by applying your base coat then use a Bobbi pin to form the red circles.
- Carefully paint some green color for petals on the sides of the red circles to complete the design.
Try creating this nail design with gel nail polish for a longer-lasting look. Use a UV lamp to make sure each nail is properly dry and enjoy this beautiful nail art for up to three weeks.
When the time comes to remove your gel nail polish, start by simply filing off the first layer. Then place 10 cotton balls soaked in acetone onto each fingernail and wrap them in aluminum foil until the remainder of the gel nail polish is easy to wipe off.
10. Easy Designs with Dots
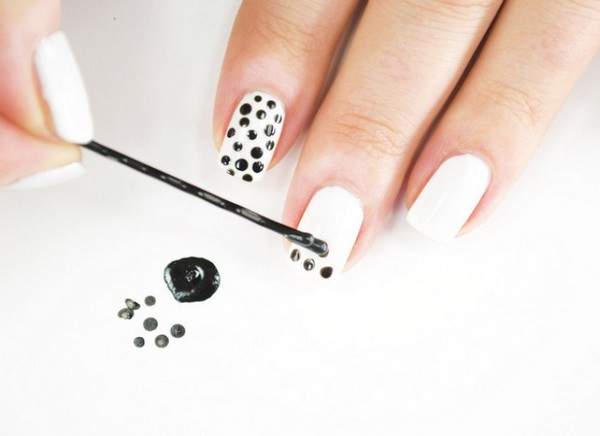
Applying dots onto your nail should not be stressful.
- The easiest way to create a nail design with dots is to simply dip a bobby pin’s round tip into some nail polish.
- Then start adding the dots onto your nail and you’re done!
11. Easy Precious Stones Nail Designs
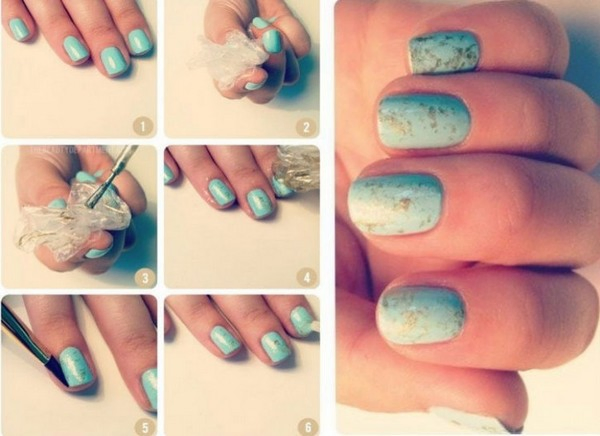
Making your nails look like precious stones can be done by simply using a crumpled-up plastic.
- First, paint your nails with a base coat.
- Then apply a metallic color on the crumpled plastic.
- Finally, dab it onto your nail to complete the look.
12. Easy Metallic Nail Designs
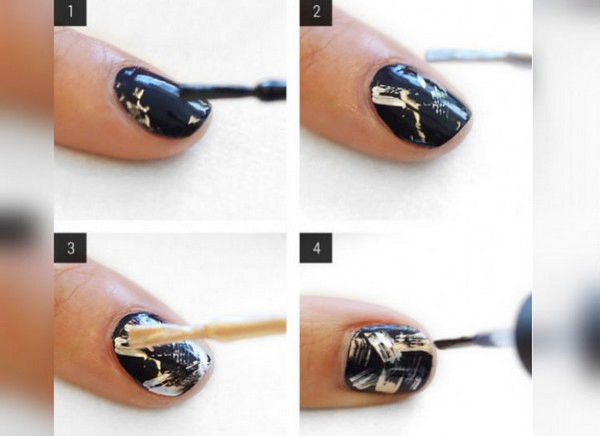
This look is punk rock meets chic and it’s one of our favorite DIY nail designs on the list.
- Begin by using a dark base coat.
- Then wipe the metallic paints carefully off the top of the bottle. This is to ensure that the bristles are visible upon applying it to the nails which will create a jagged, metallic look.
- Continue by adding a little silver and gold paint on top of your base coat.
13. Easy Zig Zag Nail Designs For Beginners
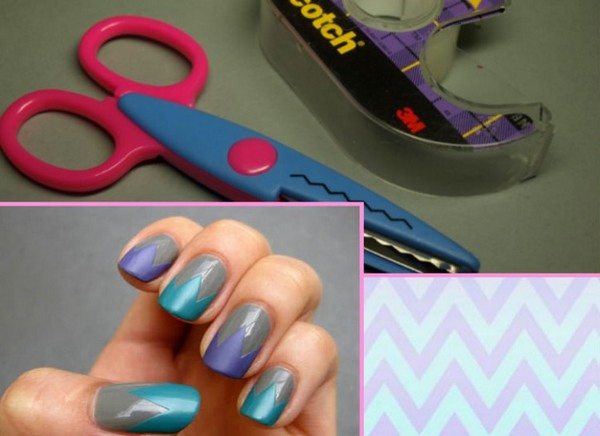
If you want to have the lastest zigzag nail trends, but find doing it yourself to be daunting, then worry no more. We’ve got you covered!
- Begin by applying a base coat of your choice.
- Use patterned scissors to cut some scotch tape and attach them to your nails.
- Complete the design by painting over the tape.
14. Easy Nail Designs with Paint Splatter
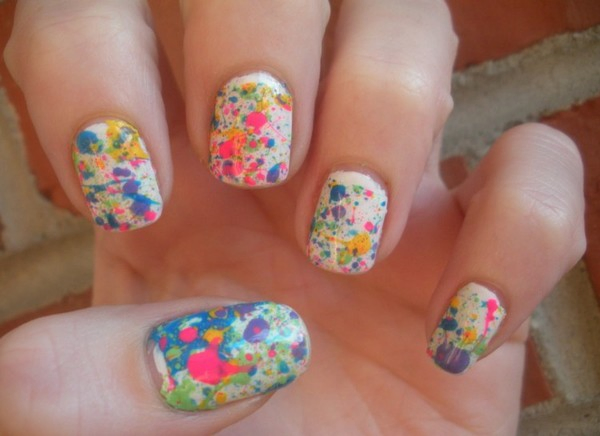
Getting this paint splatter design can be done easily with the use of a straw.
- First, apply a base coat to the nails.
- When dry, cover the outer area of your nails with some scotch tape to protect your fingers from getting splashed.
- Dip a straw into some nail polish and bow from the other end in order to splatter the polish onto your nails.
15. Easy Dripping Nail Designs
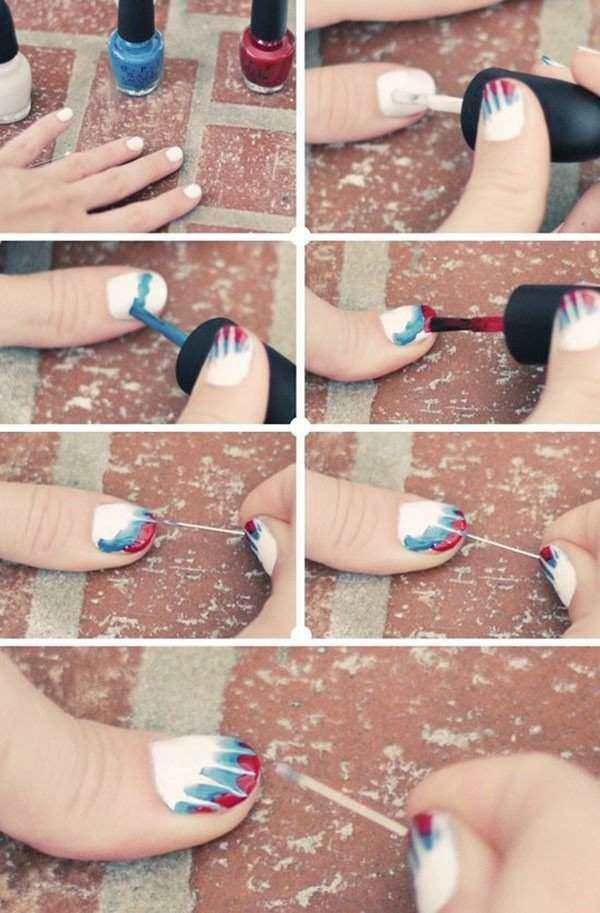
This dripping nail design is all the go right now.
- Begin by painting your nails with white then let it dry.
- Draw a diagonal line using the blue and red polish.
- Use a toothpick and spread the white polish until it reaches the top portion of the nails.
16. Easy Fishnet Nail Designs
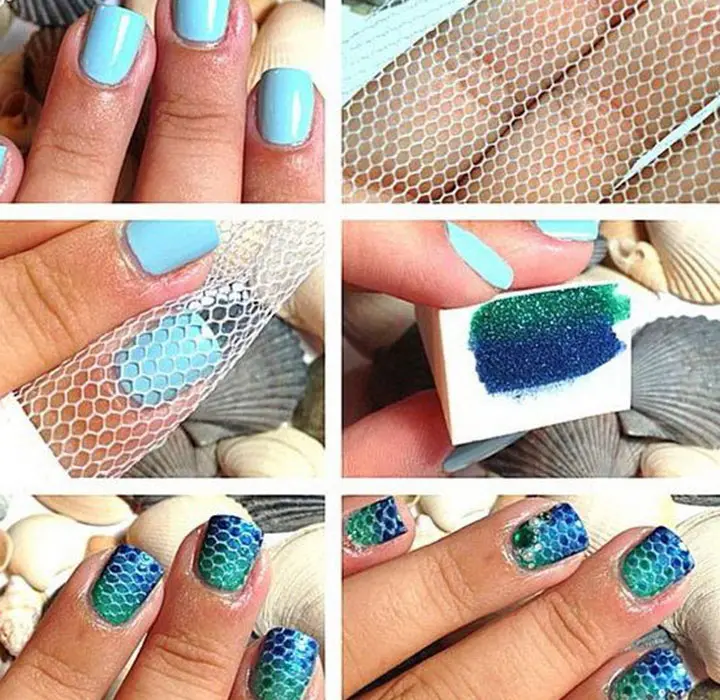
The fishnet nail design can be achieved simply by using a loofah.
- First, paint your nails with one base color.
- Next, place a loofah over your nails and paint it again.
- This time, use another color of nail polish.
- Add some glitter to complete the look.
17. Easy Nail Designs with Text
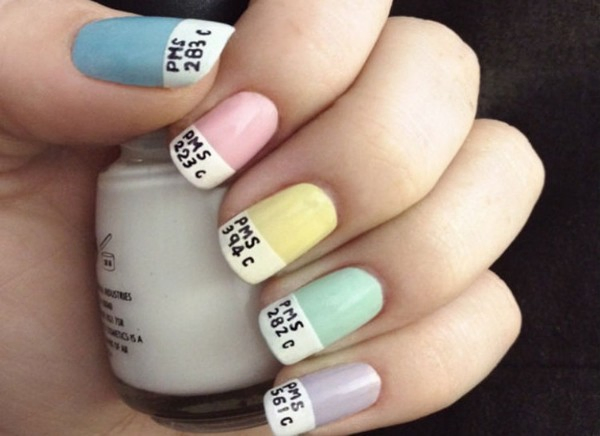
This nail design is a quirky way of adding some unique messages to your nail art.
- Start by painting all your nails with a different base color.
- Paint the tip of your nails white.
- Use a thin marker to add some writings on the nails.
18. Easy Matte Nail Designs
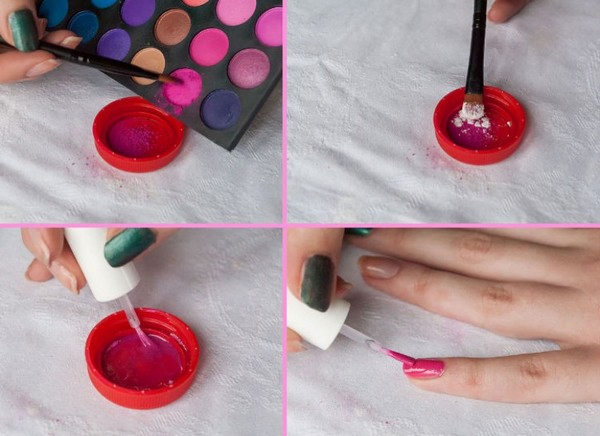
Creating a DIY matte nail polish can be easily done by creatively adding some eye shadow on your nail polish.
- Begin by dusting some eyeshadow into a container.
- Thoroughly mix the eyeshadow with your nail polish using the nail polish brush.
- Apply your DIY matte nail polish to your nails.
19. Easy Two-Toned Nail Designs
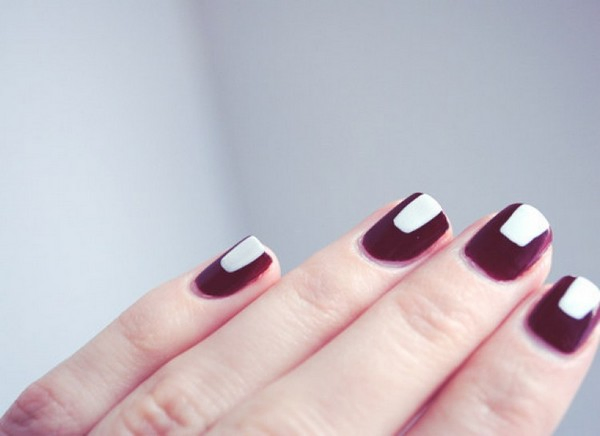
This is one of the easiest nail designs for beginners on our list.
- First, apply dark-colored nail polish as the base coat.
- Then put a single swipe of white nail polish on the top center on the nails.
20. Easy Nail Designs with Polka Dots
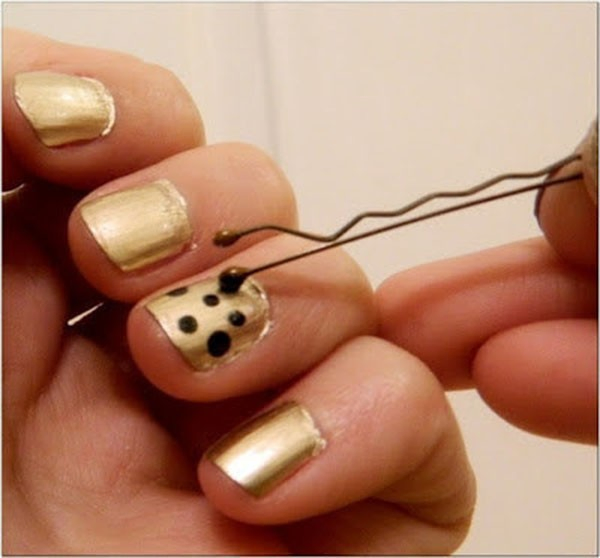
Making polka dots can be done with a toothpick, the point of a pen, or a bobby pin.
- For this look, start by applying a gold base coat to your nails.
- Dip the tip of the bobby pin into some black nail polish and place the polka dots on your nails.
21. Easy Crescent Nail Designs
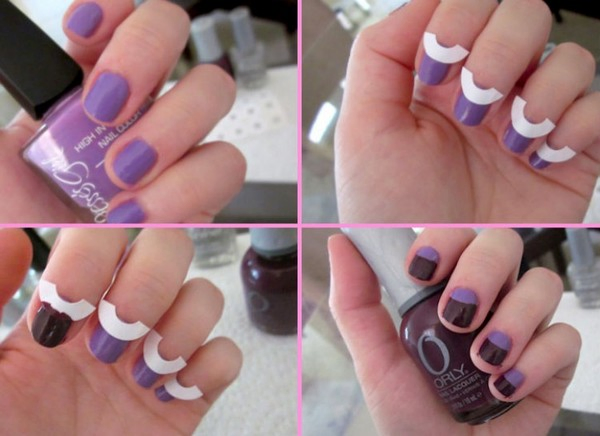
This crescent design is easily accomplished with the use of stickers.
- First, you need to apply a base coat and let it dry.
- Then stick the stickers on the lower part of the nails and apply a second color.
- Remove the stickers and you’re done.
The last thing you want to do after creating this cute nail design is to smudge it. Don’t worry, we’ve got the best tip for faster drying nails!
Tip for Faster Drying Nails
Let your nails dry for 60 seconds after you paint them, then submerge your nails into ice water for five minutes. Finish up by using the cool setting on your hair dryer for faster drying nails.
22. Easy Nail Designs with Dotted Art
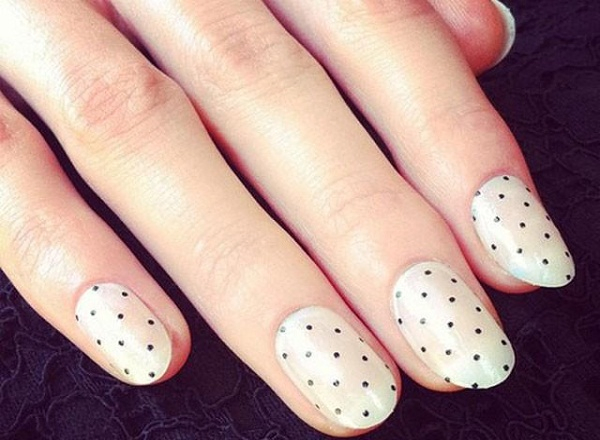
These simplistic look is super easy to create and looks especially beautiful on almond-shaped nails.
- Use a white nail polish for your base coat.
- Grab a toothpick and dip it into some black nail polish.
- Then draw the dots on your nails with the toothpick.
23. Easy Nail Designs with Yellow Tips
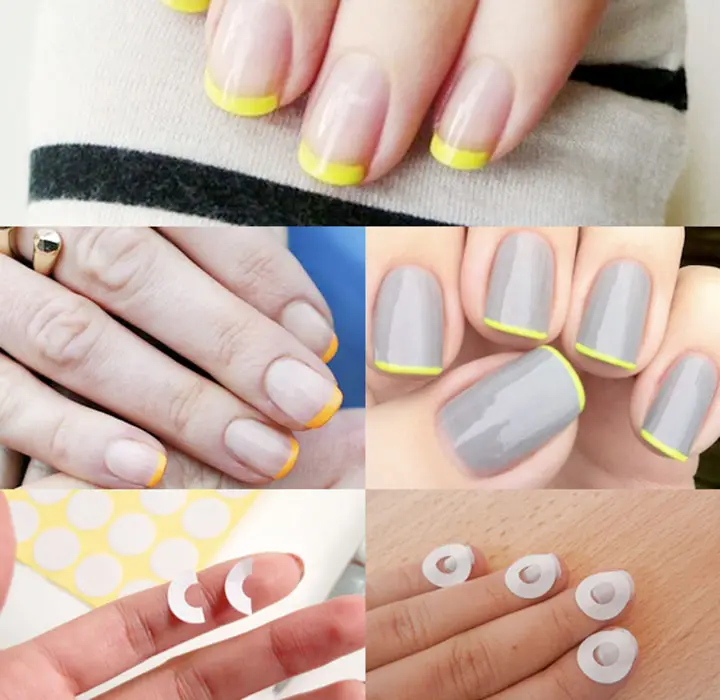
Instead of the standard white tips, why not try something a little edgier! This nail design looks especially cool on oval-shaped nails.
- Start by placing round stickers on your nails.
- Paint a yellow color on the tips of your nails.
24. Easy Nail Designs with Fine Stripes
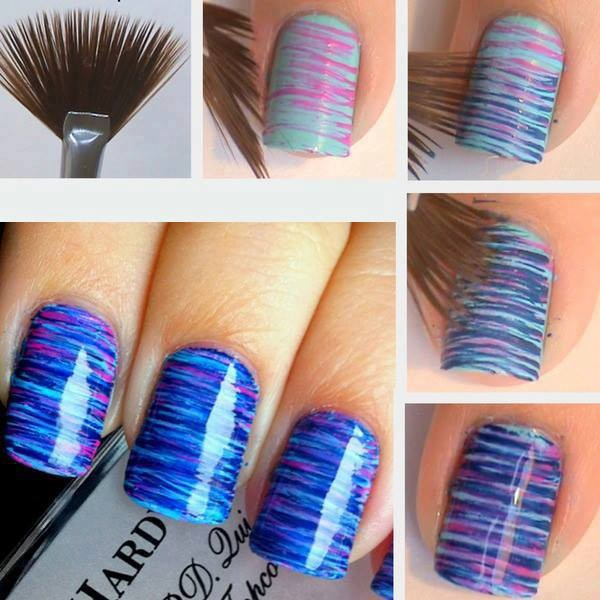
This beautiful nail design is definitely an eye-catching style you must try!
- Apply your base coat and let it dry.
- Use a fan brush in order to create very fine stripes.
- Dip the fan brush in various colors and spread them over to the nails horizontally.
25. Easy Nail Designs with Christmas Lights
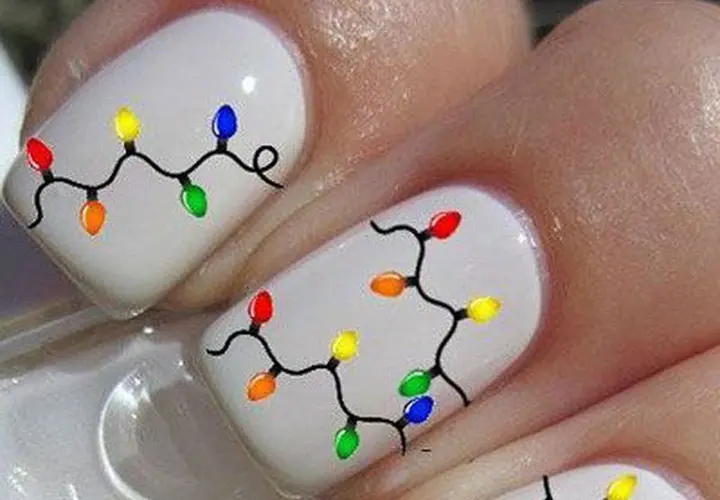
This fun nail design reminds us of an arts and crafts lesson, and the results are gorgeous! Practice creating some festive Christmas lights on your nails for this year’s holiday season.
- Paint your nails white and let them dry.
- Once it has dried up, apply a clear coat.
- While your nails are wet, loop a cotton piece of string on your nails.
- Use a cotton bud and design some lights in it.
26. Easy Gold and Black Nail Designs
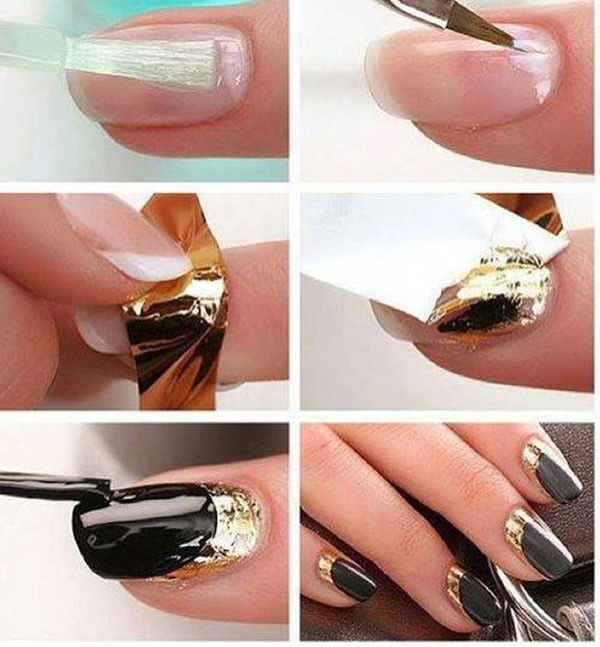
Feel like a rockstar with this fabulous black and gold nail design.
- Apply a clear coat and stick a piece of gold leaf on the base of the nails.
- Finish it up with black nail polish.
27. Easy Rainbow Nail Designs
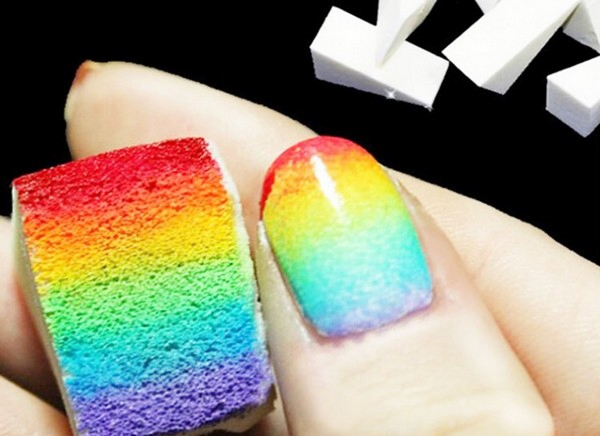
Painting a rainbow on your nails is a lot easier than you think! All you need are two nail polish colors, a sponge, and a toothpick.
- First, paint your nails with a lighter color.
- Then, pour the two nail polishes next to each other.
- Use a toothpick in swirling them together until they meet.
- Lastly, use a sponge and dab it onto the paint. Dab this sponge into the nail and move it up and down gradually.
28. Easy Diagonal Polka Dot Nail Designs
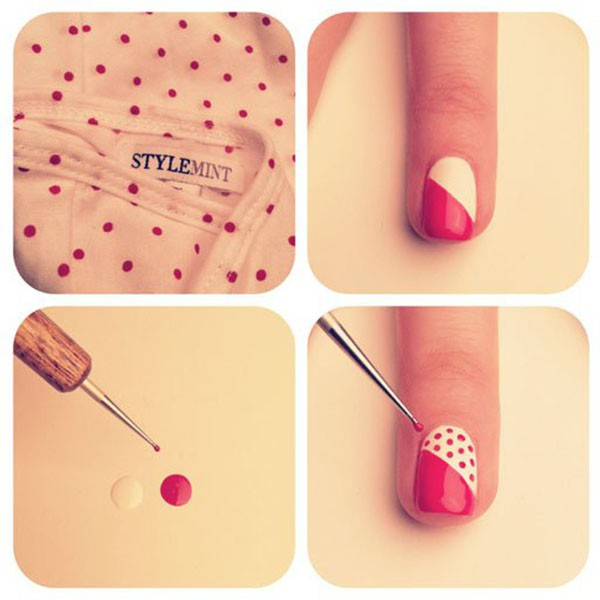
This vintage polka dot style would be perfect with a 1960s winged eyeliner look that will really make you stand out.
- Apply some white nail polish.
- Then paint a diagonal line with red nail polish.
- Use a bobby pin to create the dots.
29. Easy Nail Designs with Lace Pattern
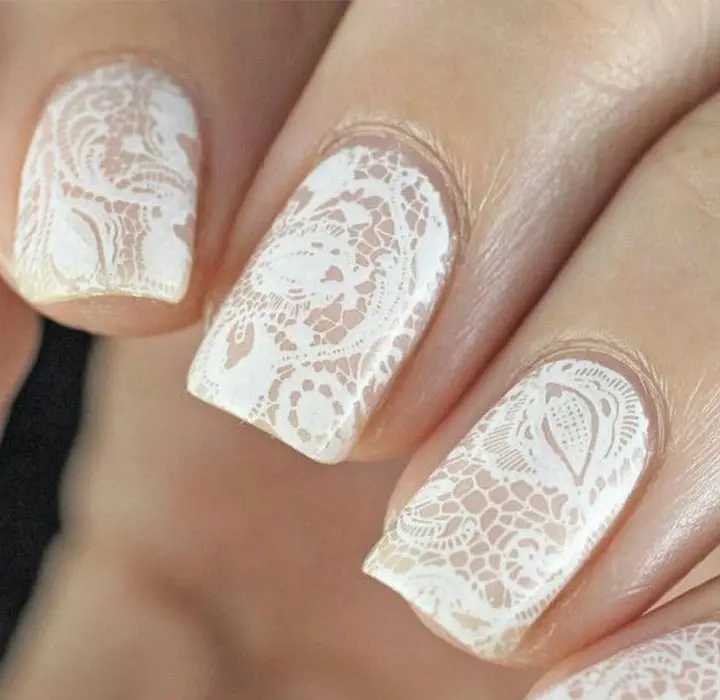
This beautiful nail design can create a snake skin pattern all from a pice of old lace.
- First, apply a clear coat on your nails and paint the tips white.
- Wrap your fingers in lace then dab your nail polish onto a clean sponge.
- Dab the sponge over the lace, then remove and let your nails dry.
30. Easy Nail Designs with Glitter French Tip
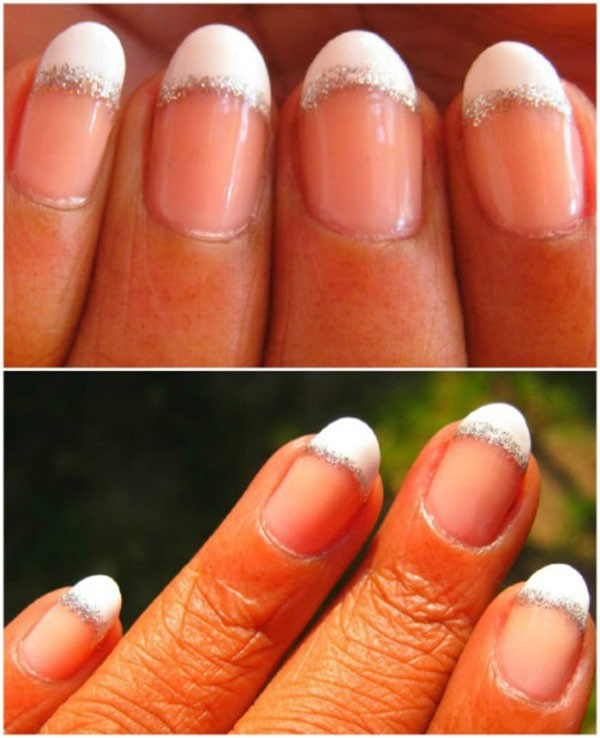
If by chance you’ve made some mistakes in creating your French mani then there’s a perfect way to hide it – with glitter! This simplistic look is also perfect for a glamorous bride on her wedding day.
- Use a glitter pen and draw a line between the white and the pink polish.
- Complete the look by painting a top coat with clear nail polish.
31. Easy Nail Designs with Different Shapes
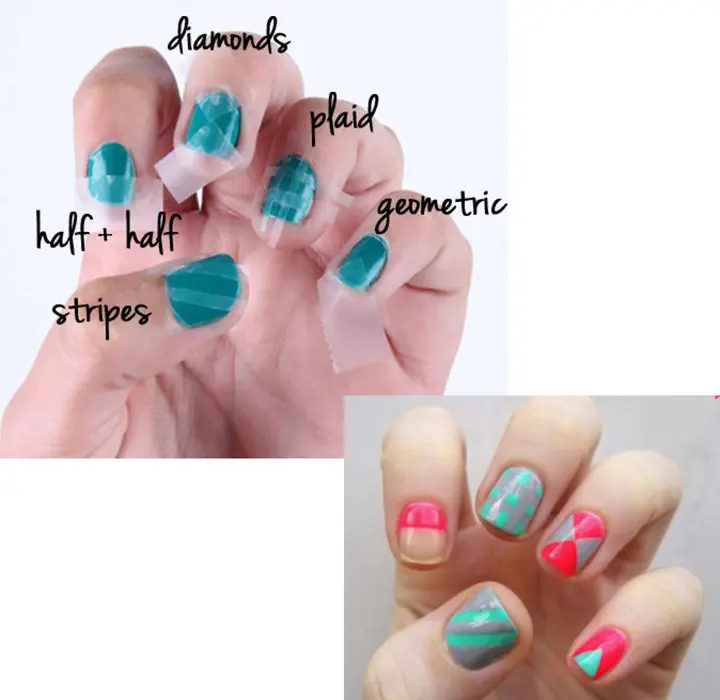
In order to achieve this assortment of creative shapes, all you need is scotch tape and some nail polish.
- After applying the base color, let your nails dry for at least one hour.
- Stick the tape to your nails according to the design that you want.
- Then apply the other colors that you desire.
If you’re someone who loves eccentric styles, add some zest to your bold nails colors and designs by creating stiletto-shaped nails.
32. Easy Nail Designs with Penguins
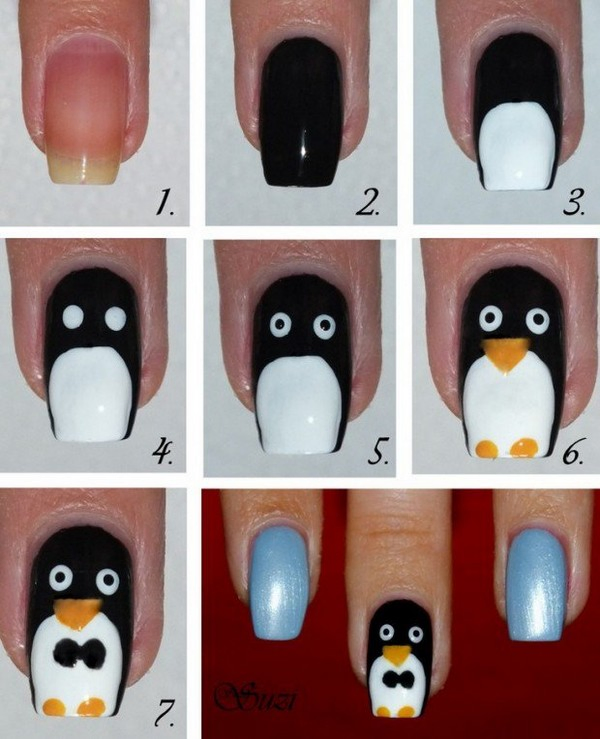
This nail design is pure art and such a quirky conversation starter! You can use original nail polish or shellac nail polish that will give your nail art a longer-lasting effect.
- First, use black polish to paint your nails.
- Use a paintbrush and white nail polish to draw a tall semi-circle shape for the penguin’s body.
- Create two white circles and place two small black circles inside for eyes.
- Use a bright orange polish in creating the beak and the feet.
- Then create a black bow in the center.
33. Easy Nail Designs with Scotch Tape
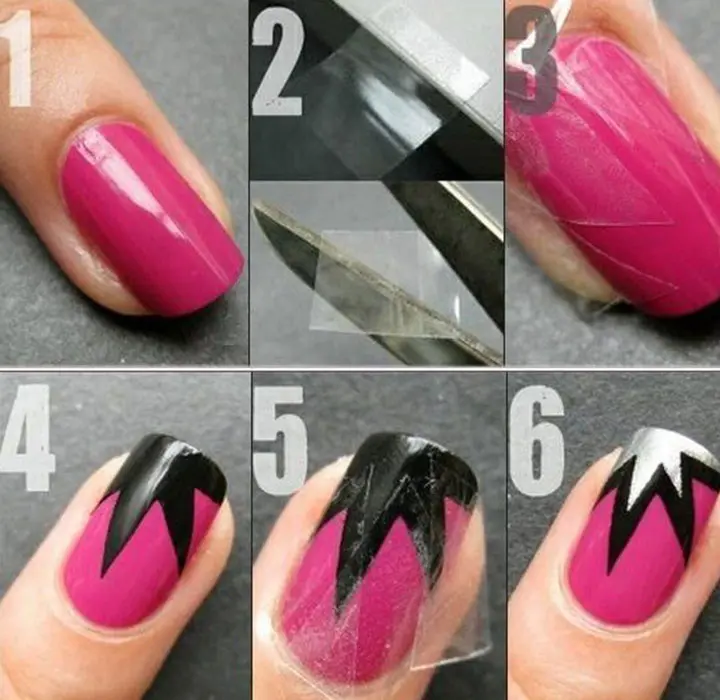
Scotch tape is your best friend when creating beautiful nail art designs.
- Use pink nail polish for your base coat.
- Stick the scotch tape on your nails to form your desired shape.
- Then, apply the black nail polish.
- Finish it up with a topcoat.
If you’re a fan of hot pink nail polish, check out our favorite cute pink nail designs that are all the go right now.
34. Easy Nail Designs with Pandas
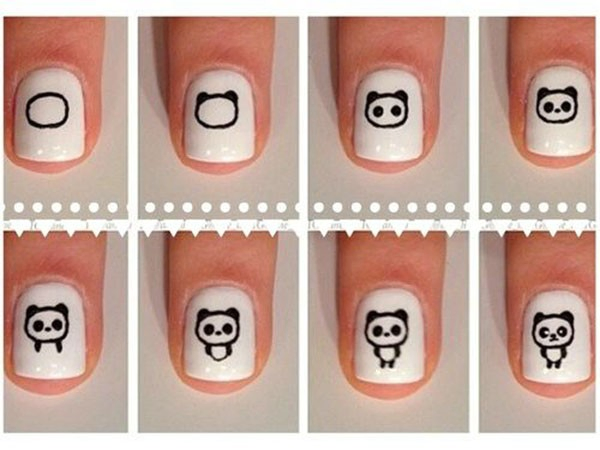
Here we see another cute animal nail design that will surely catch people’s attention.
- Apply white nail polish to your nails.
- Use a pointed paintbrush to draw the panda on each nail.
- Draw the face first then work your way down to the body so as not to smudge.
35. Easy Nail Designs with Polka Dot Tips
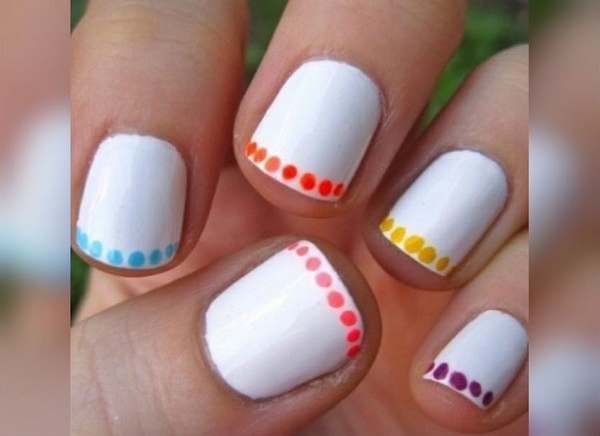
This colorful summer look is an effortless way of creating an eye-catching nail design in minutes.
- First, apply white nail polish to your nails.
- Then use a bobby pin and apply different color dots onto the tips of your nails.
- Hey presto!
36. Easy Jigsaw Puzzle Nail Design
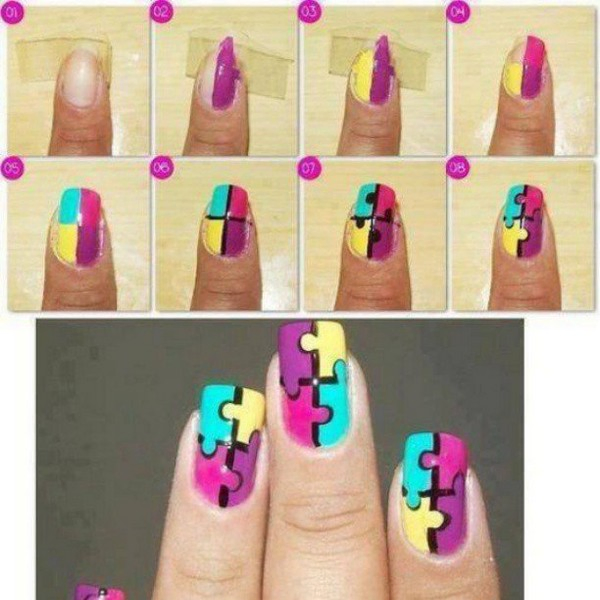
For this nail design you need four different colors of nail polish and a steady hand!
- Apply the nail polish one by one in four equal parts.
- Let the nail polish dry for one hour.
- Then use a black nail polish to draw the jigsaw design.
37. Easy Ombre Nail Designs
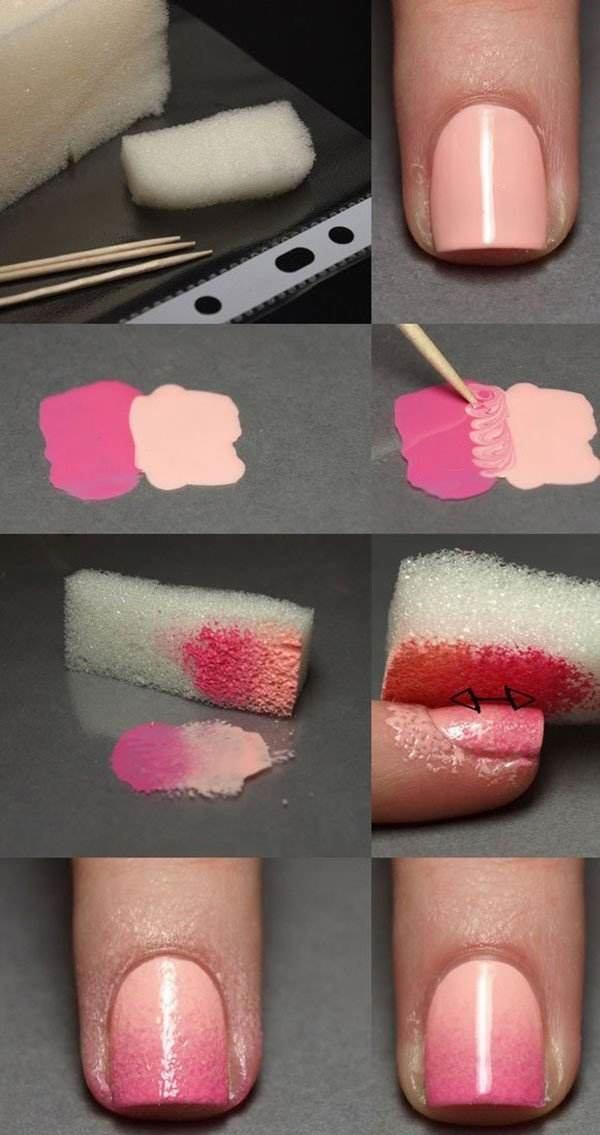
This beautiful ombre nail design is a subtle look that brings both style and a little edginess to your look.
- Paint a base color onto your nails.
- Pour two colors of nail polish into a container and use a toothpick in connecting these two colors.
- Dab a sponge onto the mixture and apply it on your nails.
- Lastly, apply a clear topcoat t protect the nail polish.
38. Simple Dot Nail Designs
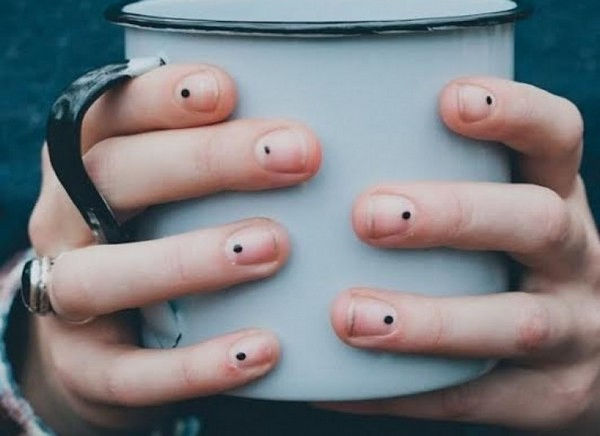
This is one of the most simplistic and easiest designs that you can do to your nails from home.
- You can opt to apply a clear nail polish fist or none at all.
- Place a single dot to your nails by using a bobby pin and create an adorable, subtle look.
39. Simple Line Nail Designs

This nail design is such a simple yet modern look.
- First, paint white nail polish onto your nails.
- Then draw a thin black line in the middle either horizontally or vertically with a pen or with black nail polish using a thin paintbrush.
40. Easy Nail Designs with Stripes
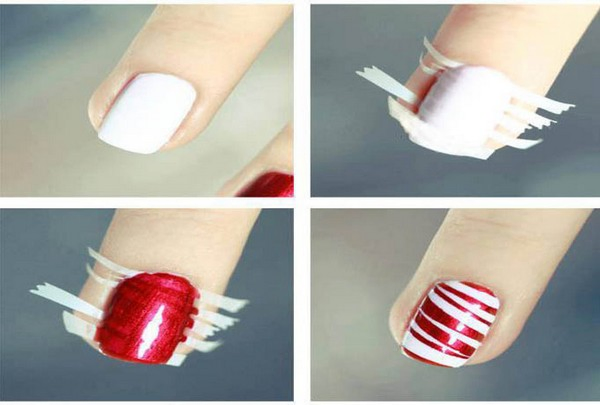
We’re big fans of the stripe look because of how easy it is to create.
- Start by applying white nail polish onto your nails.
- Cut some strips of scotch tape and stick it on your nails.
- Apply dark red nail polish then remove the scotch tape.
41. Easy Snake Skin Nail Designs
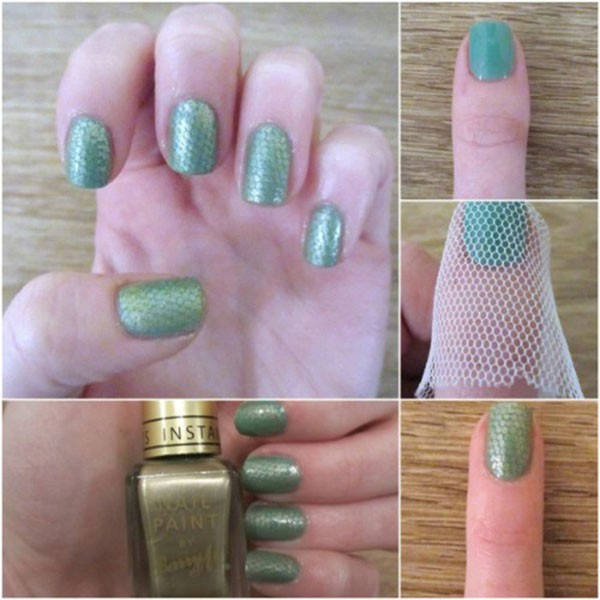
This stylish nail design looks like a lot of work, but in fact it’s incredibly easy.
- First, apply your base coat.
- Then get a loofah and wrap in over your nails.
- Make sure that the loofah is tight around your finger.
- Get a makeup sponge and dab it to your glittery nail polish.
- Dab the sponge over the netting.
- Apply a topcoat.
42. Easy Splatter Nail Design
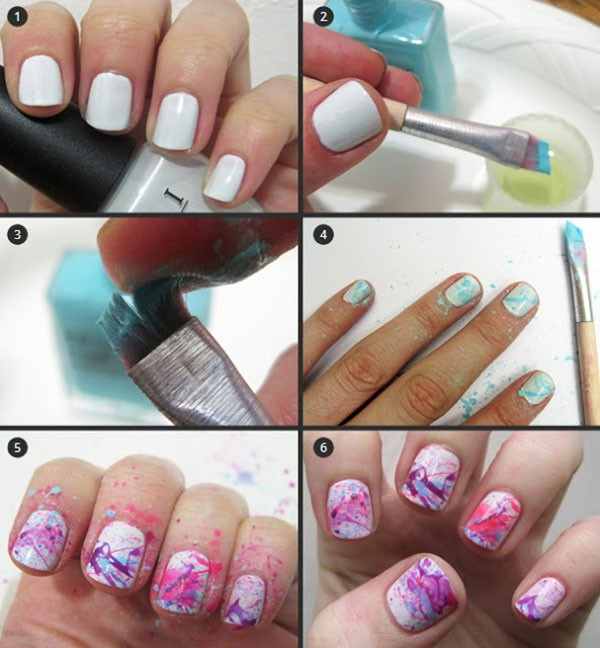
This look is perfect for both long and short nails as well as being such an easy DIY nail design.
- Start by painting your nails white.
- Get a makeup brush and dip it in bright-colored nail polish.
- Then dip the makeup brush into some nail polish remover in order to thin it out.
- Pull back the brush in order to splatter the polish all your over nails.
- Continue doing this with other colors.
- You can use at least three bright colors to complete the look.
43. Easy Tri-Color Nail Design
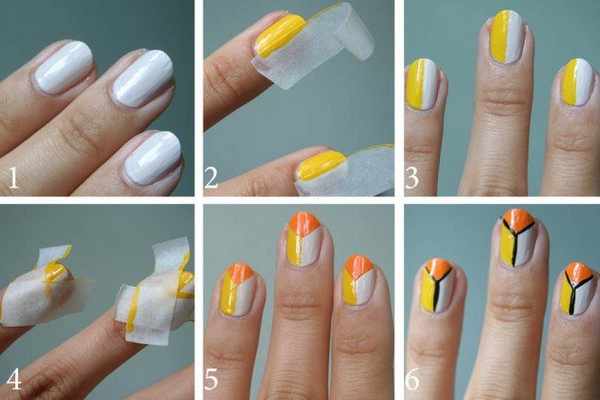
This cute nail design is a perfect look to incorporate with some bold makeup.
- Paint your nails with white nail polish.
- Stick a piece of scotch tape on one side of your nail and apply a yellow color on the other side.
- Stick two pieces of scotch tape and form a small triangle on top of your nails.
- Apply orange nail polish.
- Use a black marker or nail polish to draw the letter “Y”.
44. Easy Block Color Nail Designs
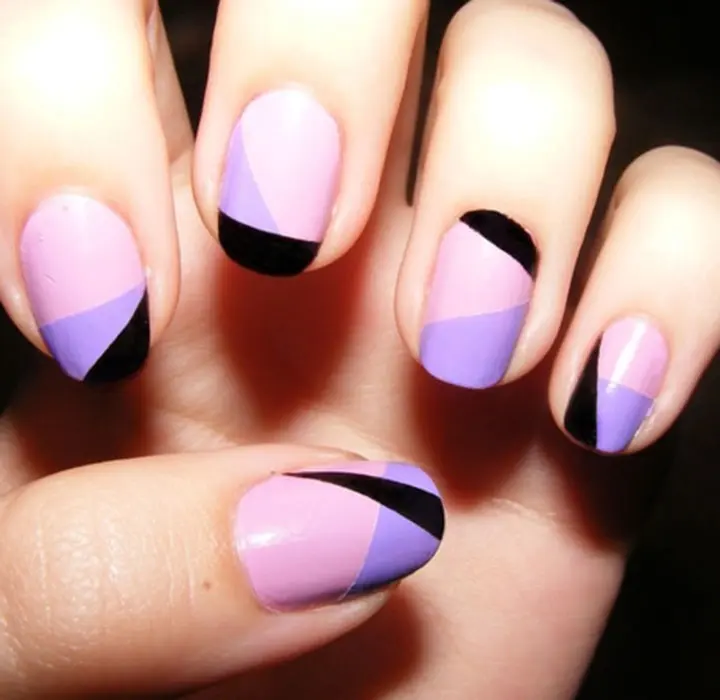
This disco look is a perfect nail design if you love experimenting with bright colors.
- Apply a pink nail polish for your base coat.
- Stick some scotch tape onto your nails to form the desired design.
- Apply the other colors to complete the look.
45. Easy Lightning Strike Nail Designs
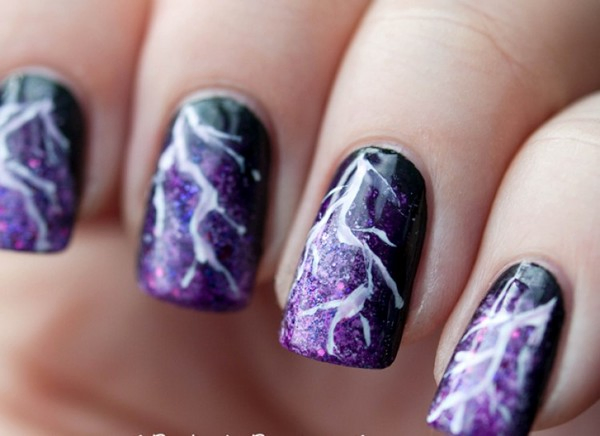
This lightning strike nail design really does the job at making as statement.
- First, apply black color onto your nails.
- Next, combine blue, white, and purple colors and mix with a toothpick.
- Use a sponge to apply the colors onto your nails.
- Then use a micro-tipped pen in order to paint a white design that resembles a lightning strike.
46. Easy Multi-Colored Striped Nail Designs
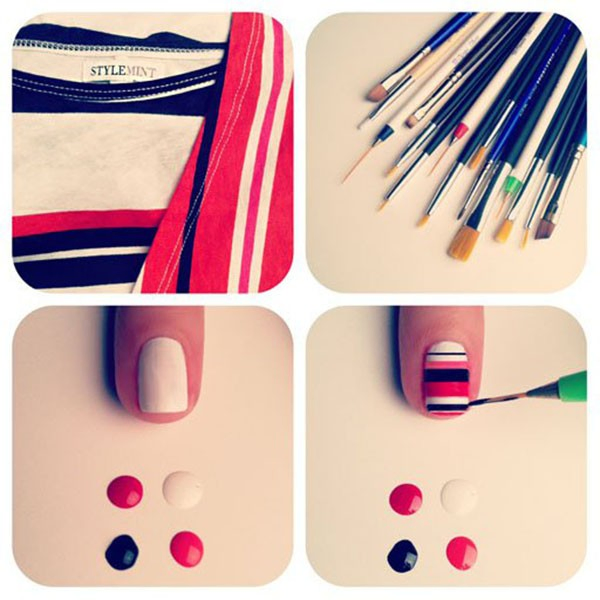
Get creative with multi-colored stripes for your DIY nail designs.
- First, paint your nails with white nail polish.
- Then simply use a thin paintbrush to draw the different stripes.
47. Easy Nail Designs with Colorful Stripes
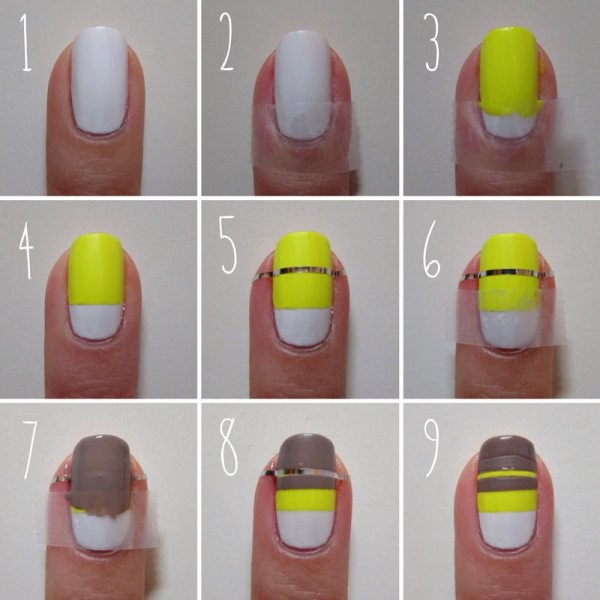
This gorgeous summer nail design is made using our favorite handy tool, scotch tape!
- Apply a white nail polish then paint yellow nail polish on the upper part of the nails.
- Stick some scotch tape to form the stripes you want and then paint the gray nail polish.
48. Easy Shamrock Nail Designs
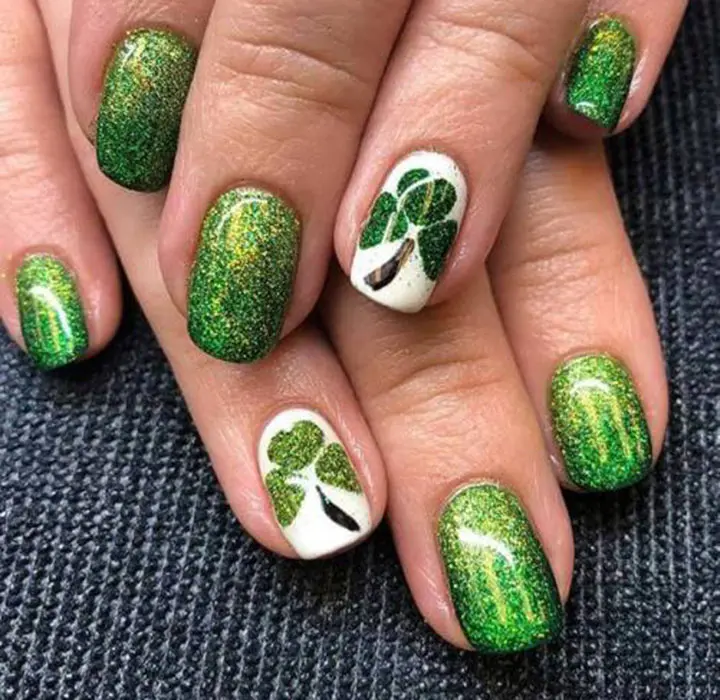
Celebrate St. Patrick’s day every year with this cool and easy shamrock nail design.
- Use a light green nail polish as your base coat.
- Use a thin paintbrush to paint the shamrock design using dark green nail polish.
49. Use Sharpies for Your Easy Nail Designs
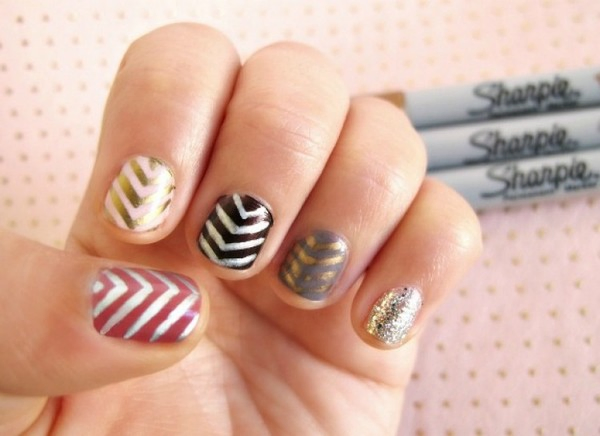
It’s not necessary that you have to use nail polish every time you do your nails. For this nail design, you can simply use sharpies in order to create these fabulous shapes.
- Start by applying a base coat.
- Then use a gold or silver sharpie to create beautiful shapes.
50. Easy Nail Designs with Yellow Triangular Tips
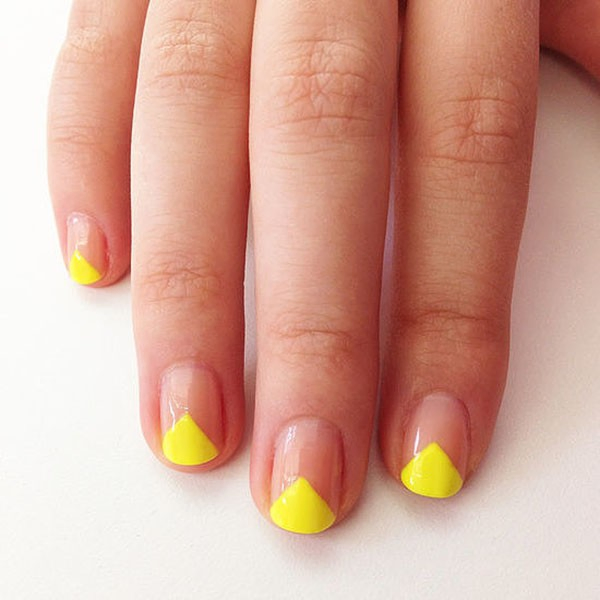
This nail design takes it idea from the classic French tips, but with a twist!
- Start with a clear base coat.
- Then simply paint a yellow triangle on the tips of your nails and apply a top coat to finish up.
51. Easy Nail Designs with Bow Ties
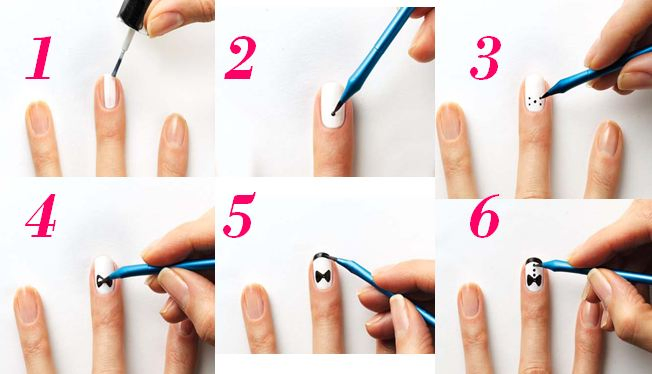
Get funky and play around with some unique nail art ideas. Why not create a tux and bow tie design for your prom to compliment your dress and make your nails the center of attention.
- First, paint your nails with white nail polish.
- Then use a pointed pen and draw the dots and the bow design. Finito!
DIY Nail Design Accessories to Use at Home
It’s clear that you don’t need to go to a salon to get beautifully designed nails. You can get creative and achieve professional-looking nails all from the comfort of your own home with these user-friendly nail design products.
Nail Art Decorations
These adorable nail art decorations are perfect for themed parties and events. You can decide to apply the jewels to all your finger nails for a dramatic look, or keep it simple by sticking one classy jewel onto one finger.
This 15 piece nail charm jewelry set comes with animal designs, Halloween nail art as well as sparkling stones that you can stick onto your nail or draw around them to make a new nail pattern.
While most of the nail charms suit those with longer nails, some of the jewels are a perfect size for shorter nails. These nail charms are an all-rounder that can suit any nail shape.
Nail Art Tools
This fantastic nail art tool kit comes with an array of useful products for nail design enthusiasts. Even if you’re a beginner at nail design, we promise these handy tools will set you up for success.
This nail art kit comes with eight different sized painting brushes, five carving and dotting pens, 12 style stencils, striping tapes, 3D rhinestones, and a manicure sponge.
Nail Art Stamping Tool Kit with Nail Polish
This nail art stamping kit is jam-packed full of quirky nail design accessories. With eight stamping plates, you can choose from cute animal prints, crackle texture, polka dots, flowers, and lots more!
This stamping nail polish kit also includes 10 striking nail polish colors such as classic gold, silver, black, white, red, vibrant green, purple, yellow, orange, dazzling laser glitter.
Nail Art Glitter Sequin Set
This nail art glitter sequin set is an absolute must have nail art supply for both professional nail enthusiasts and beginners.
You will be spoiled for creative choice with 36 boxes of nail sequins and glitter, nail glue, topcoat, nail files and buffers, cuticle trimmer, and tweezers.
Gel Nail Polish Kit with UV Nail Lamp and Nail Tools
This gel nail polish DIY Kit for beginners has everything you could possibly need.
With six eco-friendly gel nail polish colors to choose from, this nail kit also comes with an amazing easy-to-use 82W UV nail lamp that will have your nails dry in minutes.
With all these nail art supplies, you’ll need to create an organized nail rack for all your new tools and nail polish.
On average, your gel nails will last for two to three weeks but if you want them to withstand longer, keep them under the UV lamp for an extra round.
Enjoy the perks of a nail salon in your own bedroom with this practical and user-friendly nail design kit.
Your Nail Design Questions Answered
Many people are drawn to DIY easy nail designs because of how user-friendly they are, and you don’t need any special skills to achieve them. Many of our readers express interest in easy nail designs but have a few questions before they get started. Here are some of the most popular questions we’ve received from our readers on easy nail designs:
How long do gel nails last?
You can expect your gel nail design to last two to three weeks. If you want your gel nails to last a longer, you’ll need to keep them under the UV lamp for an extra round to ensure proper nail curing.
How do I remove my gel nail design?
If you have a build-up of mixed material, one of the easiest methods to remove gel nail designs is to first file off as much of the top layer as possible and remove any gems or stones that may have been used.
Continue to cut out ten 3 x 3 squares of aluminum foil and soak 10 cotton balls in acetone. Place each cotton ball on top of your nail and wrap with aluminum foil to secure the cotton ball on your nail. Keep the cotton ball on until you are able to easily wipe off the remaining gel design.
How can I dry my easy nail designs faster?
Let your nails dry for 60 seconds after you paint them, then submerge your nails into ice water for five minutes. Finish up by using the cool setting on your hair dryer for faster drying nails.
Which Nail Design did you choose?
These easy nail designs are truly awesome and so simple to do. If you want to wear one of these cool, artistic nail designs then you can easily do it yourself from home. You can also let the amazing nail art printing machine do it too. I mean it is 2021 right!?
So what are you waiting for? These DIY, easy nail designs are super achievable and can suit almost any outfit! With our beautiful selection of simple and easy nail designs to choose from, you’ll never have to visit a salon again.
Let us know in the comments which nail design is your favorite, or show us your very own DIY nail art creations!

